skip to main | skip to sidebar

It Is All About Bioprocess Technology

A New Knowledge.... A New Experience.... We Are Here To Learn....

Pages

  • Home

Saturday, October 23, 2010

Welcome!

Hallo.. Hallo.. Hallo!!! 
Welcome to our blog!

A new knowledge.. A new experience.. 
Exclusive for the pioneers of USM Bioprocess Technology


This is the story about Mr. Fermenter.
The most precious instrument in our laboratory..

Precious because it is so expensive!
Precious because this is the fisrt time we handle it!
And of course it will be more precious because we might use Mr Fermenter for our final year project..
And who knows.. we might be the future bioprocess technologists!


So, lets get started to know more about him!

These are the list of the stories.. (click to read)

FIRST DAY :Who Is Mr. Fermenter??

SECOND DAY: Sterilization of Mr. Fermenter.

THIRD DAY: The One Day Fermentation.

LAST DAY: Closedown and Cleaning

DATA AND DISCUSSION: Observation and Discussion.
Posted by BioprocessStudent at 9:04 PM 0 comments Email ThisBlogThis!Share to XShare to FacebookShare to Pinterest

Thursday, October 21, 2010

Result And Discussion


DATA AND OBSERVATION

Understanding the yeast behaviour by using data of Optical Density, Glucose and IRIS.

Table 1: Optical Density And Glucose Reading

No
Time
(hours)
Sample code
Optical Density (600 nm) x dilution factor
Glucose (mmol/L) x dilution factor
1
1255
T0
0.882
78.960
2
1455
T2
1.382
39.400
3
1555
T3
4.980
19.100
4
1655
T4
8.670
Lo
5
1755
T5
11.350
Lo
6
1855
T6
8.400
Lo
7
1955
T7
13.965
Lo
8
2055
T8
9.612
Lo
9
2155
T9
10.660
Lo
10
2255
T10
18.660
Lo
11
2355
T11
14.325
Lo
12
0055
T12
17.125
Lo
13
0255
T14
14.730
Lo
14
0455
T16
20.125
Lo
15
0655
T18
17.320
Lo
16
0755
T19
34.920
Lo
17
0920
T20
33.705
Lo
18
0955
T21
45.150
Lo
*Lo indicates that the reading of glucose is lower than 2.0mmol/L


The figure above shows the optical density (O.D) versus time (hour). Optical density measured
by using spectrophotometer are  used to measure the concentration of bacteria in a suspension. As visible light passes through a cell suspension the light is scattered. Greater scatter indicates that more bacteria or other material is present. The amount of light scatter can be measured in a spectrophotometer. We determined the optical density at 600nm wavelength that correlates with the different phases of bacterial growth. 

Graph above shows the concentration was increase by time. As time go on, the growth of cell is increase. Thus, it leads to increase on concentration of cells within the fermenter. So that the O.D reading continuously increase by time because it measure all the dead and live cell in fermenter.

By the way, the kit indicates that the glucose is decreasing with time because the yeast continuously utilizes it as main nutrient source. After 4 hours fermentation, the glucose reading decrease dramatically to lower than 2.0mmol/L. It might be because the yeast already undergo the log phase which is the fasters growing phase.  

Figure 2: Graph reading from IRIS; consist data of Stirrer rpm (red), temperature (yellow), pH (green), pO2 % (blue), antifoam % (dark-green), base pump ml (light-blue), AF pump ml (dark-blue)  versus time.


S.cerevisiae undergo aerobic fermentation. So, oxygen is continuously supplied into the media. Blue line shown us the percentage of dissolve oxygen and oxygen used by the cells. At the first stage of the fermentation, we can see the blue line was dropped. This condition gave us information that the yeast cells used the oxygen that dissolved in the media with proportionally helped by agitation process. Because of that, we can see the stirrer rpm (red line) inversely proportional to dissolved oxygen (blue line). The figure above gave us also information about high formation of foam at the first stage through the percentage of anti foam used. High percentage of anti foam used at the beginning because we want to break off the high of foam formation. Then, the percentage of anti foam become low and constant until the end.

While, as the fermentation go on, the medium become more acidic. It is because the production of metabolite by yeast itself. But, after certain period; it might be the time where they are not actively growing, the pH increase especially after 14 hours of fermentation. At this point, temperature and stirrer speed started to decrease where as the dissolve oxygen increase dramatically. The yeast cell might reach to the stationary phase.


CONCLUSION

After 4 day of marathon culturing Saccharomyces cerevisiae using our new 2 L fermenter, we had learned a lot. We had not only learn all the theoretical part that had been learn in lecture hall but also other problem that can be occur during fermentation process using bioreactor. Along the 4-day, we had learned and knew all the part needed to build a complete fermenter to grow microorganism. The function of all the part is specific and need to be handle with care. We also learn hoe to autoclave the whole fermenter. We also had the basic technique to inoculate microbe during fermentation process. The type of medium needed for Saccharomyces cerevisiae growth and the sterilizations process that involve in fermentation. Another precious knowledge is we learn how to use the software Iris and read the condition inside the fermenter.


Growth culture in fermenter is better and efficient than growing inside the shake flask. Living in fermenter is like a comfortable bungalow with sufficient of air, medium, dissolve oxygen, nutrient, pH and other substances that needed for the particular microbes to grow. We also had learned that to grow microbes is actually quite similar as we take care and growth our pet. We need to give them food and comfortable condition so there can growth and produce well.


THAT'S ALL.....

FROM US :


NURUL AMANI BT WALDIN
NORRABIDAH BT MOIDEN
NUR' HAMIZAH BT ZAINOL
NUR HIDAYAH BT NURDIN
NUR FAIEZAH BT A RAHMAN
NUR IZZATI BT ANUAR

PREPARED FOR :


PUAN WAN NADIAH WAN ABDULLAH

LECTURER OF BIOREACTOR DESIGN AND OPERATION (IBG 302/4)


Posted by BioprocessStudent at 7:45 PM 0 comments Email ThisBlogThis!Share to XShare to FacebookShare to Pinterest

Wednesday, October 20, 2010

FOURTH DAY

Last Day : WASH.... CLEAN.... WASH....

Date : 7 October 2010
Time : 10.00 a.m
Venue : Lab 148

Today was the last day... What we supposed to do today is CLOSEDOWN AND CLEANING...


Saccharomyces cerevisiae have successfully growth for 1 day. We then ready to clean the yeast and dismantle the fermenter to store as it comes before. That we are using the wild type yeasts those are not pathogenic so we can simply flow the yeast and the medium into sink. It is different if the microbe uses are pathogenic and new type of recombinant. If the microbe are danger to be leave to nature, we have to autoclave it properly just as we autoclave the medium before inoculation. By doing this we manage to kill all the microbe and only release the dead microbe n left over medium to nature. As to be good technologists we have to take care of nature and give no harm to them especially when involving our own research reagent.

Now, WASHING AND CLEANING TIME..!!!!

First, stop any reagent addition, stop aeration and off any remote control from IRIS. Stop the main switches to power supply as well before start to dismantle the component of this fermenter. For our fermentation process the temperature was around room temperature. For other fermentation of microbe that involving high temperature, we need to slow down the temperature and wait until the fermenter are cool down. 

Next step, we empty the reagent bottle lines and discard the cannot reusable reagent. Reagent like antifoam, alkali or acid can be store for next usage.

So, let's have a look how our friend wash the Mr Fermenter..~
All the probes and tubes must be removes...

Next is to clean the vessel, remove the top plate and then remove the probes one by one. As for pH electrodes, after rinse with water need to be cap back into the liquid electrolyte. All the electrodes remove, clean and return to boxes.

Empty the vessel by flowing the medium into the sink...

See... Tadaaaa~ clean and shine enough right????

Observation Under Microscope
We manage to collect some sample before cleaning the fermenter. We drop few drop of sample on slide and observed under microscope. The result seen under the microscope is as below..

S.cerevisiae under microscope.
From the picture above we can clearly see that, the yeast are growth well and there are no contamination happen to the culture. This is one of the benefits of using fermenter to growth culture, the percentage to be contaminated are low. There are difficult to be contaminated unless the inoculums itself have been contaminated before being introduce to the vessel or all the aseptic technique to maintain sterility are not taken.

Finally, our practical class was end... Although it was so tired, but the moment we spent our time with Mr Fermenter, we were more understand what has been thought by Puan Wan Nadiah in our class... We get the overview of using and handling the bioreactor... We can touch it, see it, run it, wash it... And everything... For sure, it was the interesting moment in our life... Not just handling the bioreactor, we also experienced the late night experiment.. That was the most unforgettable moment during the 4 days with Mr Fermenter... Thanks a bunch~ (^_^)


Posted by BioprocessStudent at 9:55 PM 1 comments Email ThisBlogThis!Share to XShare to FacebookShare to Pinterest

THIRD DAY: 24 Hours Lab


THE ONE DAY FERMENTATION

Date : 6 October 2010
Time : 9.00 a.m
Venue : Lab 148

Let's continue the story....

Before fermentation started, we need to do some set up for our mini fermenter. First, what we need to do is to prepare vessel...

These are the checklist :
  • Medium already contain all nutrient needed for batch operation. (filled up before sterilization)
  • Calibrate pH electrode, with buffer pH 7 for high and buffer pH 4 for low.
  • Calibrate pO2. ( we used nitrogen zero O2 calibration and air compressor for 100% O2 calibration.


Now, the bioreactor is ready to be set up.. This is the suitable condition for the little yeast :
            • Agitator speed : 300 rpm
            • Temperature : 30 C
            • pH value : pH 5.0
            • pO2 (dissolved O2) : 30 %
            • Antifoam control

 !!!!! make sure all the controls were turned ON.


After finishing all set up, we inoculated the seed culture of Saccharomyces cerevisiae  which had been fermented overnight in shake flask at 30°C and 200 rpm.
Now, it is the time for our little yeast to be transferred into their new home:


Mr. Fermenter -MINIFORS.
Scale up : Approximately 10% inoculums added into 1.5 ml medium

We took T0 sample right after the inoculation.
Here, how we draw out the sample from the vessel.

First, we need to unclamp the tube which connect the vessel and the sampling bottle.


Secondly, pull out some sample by using syringe. Do not too much, as long as enough for OD and glucose reading.

Thirdly, we need to clamp again the tube from the vessel to the sample bottle and unclamp the sample bottle to the outlet. as maintain aseptic technique, sprayed alcohol to the end of the tube.

Now, push the entire sample out from the bottle.

Finish sampling.. Then, take the OD reading using spectrophotometer at 600nm.
While glucose content can be determined by using diabetic blood glucose meter available along with the test strips.

The OD value represent the cell viability inside the bioreactor, while by taking the glucose value we could know how much carbon source they (our yeast) have eaten.

Thus, as fermentation go on, the OD reading should increase where as glucose level decrease because we just feed them once.

Every one hour, we took a sample out from vessel to check the OD value and glucose level. We did it for 24 hours. So that, we could know how our little yeast have been doing…

See the cloudiness of medium??
This picture is taken around 3.00AM after 15 hours fermentation. The cell now is mostly saturated and they has limited medium left.


Here Comes The Problems....

While we are handling our first bioreactor, of course there will be some problem occur. Although we learn theoretically perfectly, but it doesn’t mean that we are mastering how to handle the bioreactor. 

After approximately 7 hour fermentation, foam drastically started to increase. So, we increase the addition of antifoam manually. When we are adding antifoam, the air supply must be stopped because if not, the pressure inside will force the medium to enter to the antifoam tube.

Thankfully we have seen how Mr. Sharman handles the foam formation while calibrating the pO2. So that, we know what button we should press.


Foaming can cause a big trouble to a fermentor. The foam might reach to the top plate of vessel and enter to the each open line there.

One more problem is pressure. When we handle a bioreactor we should know that pressure inside is higher than outside. So that when draw a sample, ensure which clamps should open or off. If not, oversampling might be happen.


Posted by BioprocessStudent at 9:33 PM 4 comments Email ThisBlogThis!Share to XShare to FacebookShare to Pinterest

SECOND DAY: Seed Culture Preparation and Sterilization


Date : 5 October 2010
Time : 8.30 a.m
Venue : Laboratory 148

Good morning everyone! We woke up early today because our Mr Fermenter was waiting for us.

Today, we gain a lot of new knowledges...

First thing that we must do is to prepare the seed culture... By using aseptic technique, we transfer the S.cerevisiea into the media that we have prepared yesterday... Then, the seed culture  was leave overnight in the incubator shaker with temperature 37°C...


DONE...!!!


Next step is STERILIZATION.

What is mean by sterilization???
Sterilization is a term referring to any process that eliminates (removes) or kills all forms of life including all transmissible agents such as fungi, bacteria, viruses, spores, etc that present on a surface contain in a fluid, in medication or in a compound such as biological culture media. sterilization can be achieve by applying the proper combinations of heat, chemical, irradiation, high pressure and filtration.

Why the fermenter must be sterilized???

Because we want to prevent the contamination of the media..

Prevention is better than cure right? 

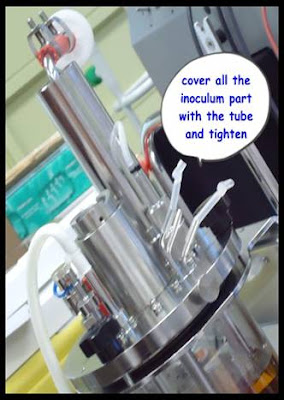
So, what we supposed to do is setting up Mr Fermenter for sterilization...


Here we go...
Picture above... See the tube??? We tighten at the end of each line to prevent the steam to enter the line during sterilization... Make sure, all the inoculation line must be covered. 


The tube was inserted well...


Cover all the end of tube and filter with cotton and aluminium foil.


Make sure all the selected part was covered properly... Do the final check...


Autoclave was ready, waiting for Mr Fermenter to come in...
Autoclave said : welcome fermenter..may you comfortable stay inside me...hehe~


 Locate the fermenter properly.... bye bye fermenter...


Setting up the autoclave...121°C for 15 minutes... Do not prolong the time. It can cause caramelization of media.


After 15 minutes and a few hours to cool down the Mr Fermenter... Then he come out....~


Mr fermenter was successfully sterilized... So, the next step is INOCULATION


Inoculation will be done tomorrow... So, see you tomorrow Mr Fermenter.....
Although the step looks simple, it takes a longer time to setting up the fermenter because a lot of things need to attach there. Therefore, we just see and take pictures as much as we can... 

Oh, tomorrow Mr Sharman will treat us KFC... Waaa, thanks a lot Mr Sharman... We love you..(^_^)


Posted by BioprocessStudent at 4:29 PM 2 comments Email ThisBlogThis!Share to XShare to FacebookShare to Pinterest
Newer Posts Older Posts Home

Total Pageviews

we are bioprocess technologists

My photo
BioprocessStudent
We are group 3 of bioreactor operation practical class. This blog consist of our 'story' about handling a bioreactor. Here, we come with introduction, discussion and conclusion for several experiment. Group 3 IBG302.
View my complete profile

group member 1

group member 1
nur izzati bt anuar

group member 2

group member 2
nurul amani bt waldin

group member 3

group member 3
norrabidah bt moiden

group member 4

group member 4
nur hidayah bt nurdin

group member 5

group member 5
nur' hamizah bt zainol

group member 6

group member 6
nurfaiezah bt a.rahman

Blog Archive

  • ▼  2010 (6)
    • ▼  October (6)
      • Welcome!
      • Result And Discussion
      • FOURTH DAY
      • THIRD DAY: 24 Hours Lab
      • SECOND DAY: Seed Culture Preparation and Steriliza...
      • FIRST DAY: The Story Begin

bioprocess technologist

  • The Life & Times Of Mr. Bioreactor
    The series of Experiment using Minifors Bioreactor
    14 years ago
  • The Story of Room 148
    FINAL EPISODE~
    14 years ago
  • the BIOPROCESS technologists

Followers


Powered by Blogger.
 
Copyright (c) 2010 It Is All About Bioprocess Technology. Designed for Video Games
Download Christmas photos, Public Liability Insurance, Premium Themes